Thank you for purchasing our industrial all-in-one PC. Please read this manual carefully before use — it contains important information and safety notices related to the operation of the device.
We are committed to continuous technological innovation and performance improvement. The contents of this manual and product specifications are subject to change without prior notice. Thank you for your understanding.
- 1 Do not place the unit in an unstable location where it may fall.
- 2 Avoid exposing the unit directly to sunlight or other heat sources.
- 3 During thunderstorms (especially with lightning), unplug both the power cord and network cable.
- 4 Do not step on or crush the power cord; avoid bending or tangling it.
- 5 This unit operates on AC 100V–240V. Ensure proper grounding and avoid sharing an outlet with high-power appliances.
- 6 Avoid overloading wall outlets or extension cords to prevent fire or electric shock.
- 7 Clean the unit only with a dry, soft cloth (non-volatile cleaner).
- 8 Avoid exposing the unit to extreme temperatures, solvents, acids, alkalis, water, or humid environments.
- 9 Prevent insects, rodents, or foreign objects from entering and causing damage to parts (housing, LED screen, ports, components, circuits, etc.).
- 10 Do not authorize unauthorized agencies or individuals to repair, add, or disassemble this product.
- 11 Installation must be performed under the guidance of qualified personnel and in an appropriate location.
- 12 Unplug the power cord if the product will not be used for an extended period.
- 13 Do not use accessories that are not specifically designed for this unit.
To ensure you receive goods in perfect condition, please inspect the package together with the courier upon delivery. Confirm there is no shipping damage or missing items before signing. If damage or missing items are found, do not sign — retain the goods, packaging materials, and accessories, and contact us immediately. Any product discrepancies found on the day of receipt will be considered accepted if not reported; our company will not be held liable (unless otherwise specified in the contract).
After unpacking, in addition to the industrial all-in-one PC, please confirm the following accessories are included:
| Power Adapter × 1 | Power Cable × 1 | Mounting Kit × 1 |
| Warranty Card × 1 | User Manual × 1 |
The warranty period begins from the date of purchase and lasts three years. The first year is covered free of charge; the following two years are provided at cost price.
During the first year of warranty, if the product cannot operate normally due to quality issues, we will provide free repair service. The following situations are not covered under warranty:
- Products or parts beyond the applicable warranty period.
- Damage caused by misuse, improper maintenance, or storage; improper use, improper insertion/removal of external devices, drops, or abnormal external pressure.
- Damage caused by exposure to extreme temperature, solvents, acids, alkalis, water, moisture, insects, rodents, or foreign objects.
- Damage resulting from repairs, modifications, additions, or disassembly by unauthorized agencies or individuals.
- No valid sales invoice or warranty card (unless otherwise agreed in the contract).
- Damage caused by software that is unlicensed, non-standard, or not publicly released.
- Damage caused by force majeure or unforeseen events.
For devices beyond the warranty period or outside the free warranty scope, users may still receive maintenance services from our company, but costs for parts and labor will be charged.
Our industrial all-in-one PC is an integrated workstation specially designed to meet industrial demands. It integrates a high-specification touch display and a high-performance industrial control motherboard, supporting complex operations and flexible expansion. The rational structure and advanced design make it widely applicable in industrial automation, power, transportation, military, communications, networking, healthcare, commercial, artificial intelligence, and many other fields.

We have a customization service team with outstanding design and development capabilities, able to quickly transform customer ideas and needs into practical solutions, creating differentiated product value for our clients. Our customization scope includes but is not limited to:
- 1 The power cord must maintain good contact; avoid loose connections, sparks, fire, or voltage fluctuations.
-
2
When shutting down, close all running programs first, then click
"Start" → "Shut Down"
Wait for "No Signal" to display before turning off the AC power switch. - 3 After powering off, wait at least 5 seconds before restarting. Avoid frequent power cycling as it may cause mechanical damage and reduce service life.
- 4 If the unit will not be used for a long period, disconnect the external power supply (turn off the power strip or unplug the power plug).
- 5 During thunderstorms, it is recommended not to use the unit; unplug the power cord and network cable to prevent lightning damage.
- 6 After using USB drives, mobile hard drives, or other external storage devices, follow the proper procedure to safely eject before removing.
- 7 Under no circumstances should you arbitrarily add, delete, or modify operating system files and settings.
- 8 If special needs require it, use third-party software to repair/restore the system.
- 9 When cleaning the unit, first disconnect the power. Use a slightly damp soft cloth to gently wipe — be careful to prevent liquid from entering the unit.
- 10 Do not use the unit in direct sunlight or excessively bright environments, as this may affect visual display and could damage screen electronic components.
- 11 To maintain optimal performance and extend service life, use the unit within the appropriate temperature and humidity conditions.
When the unit malfunctions, first try the methods listed below. If the issue cannot be resolved, contact our after-sales service department and we will arrange a factory repair.
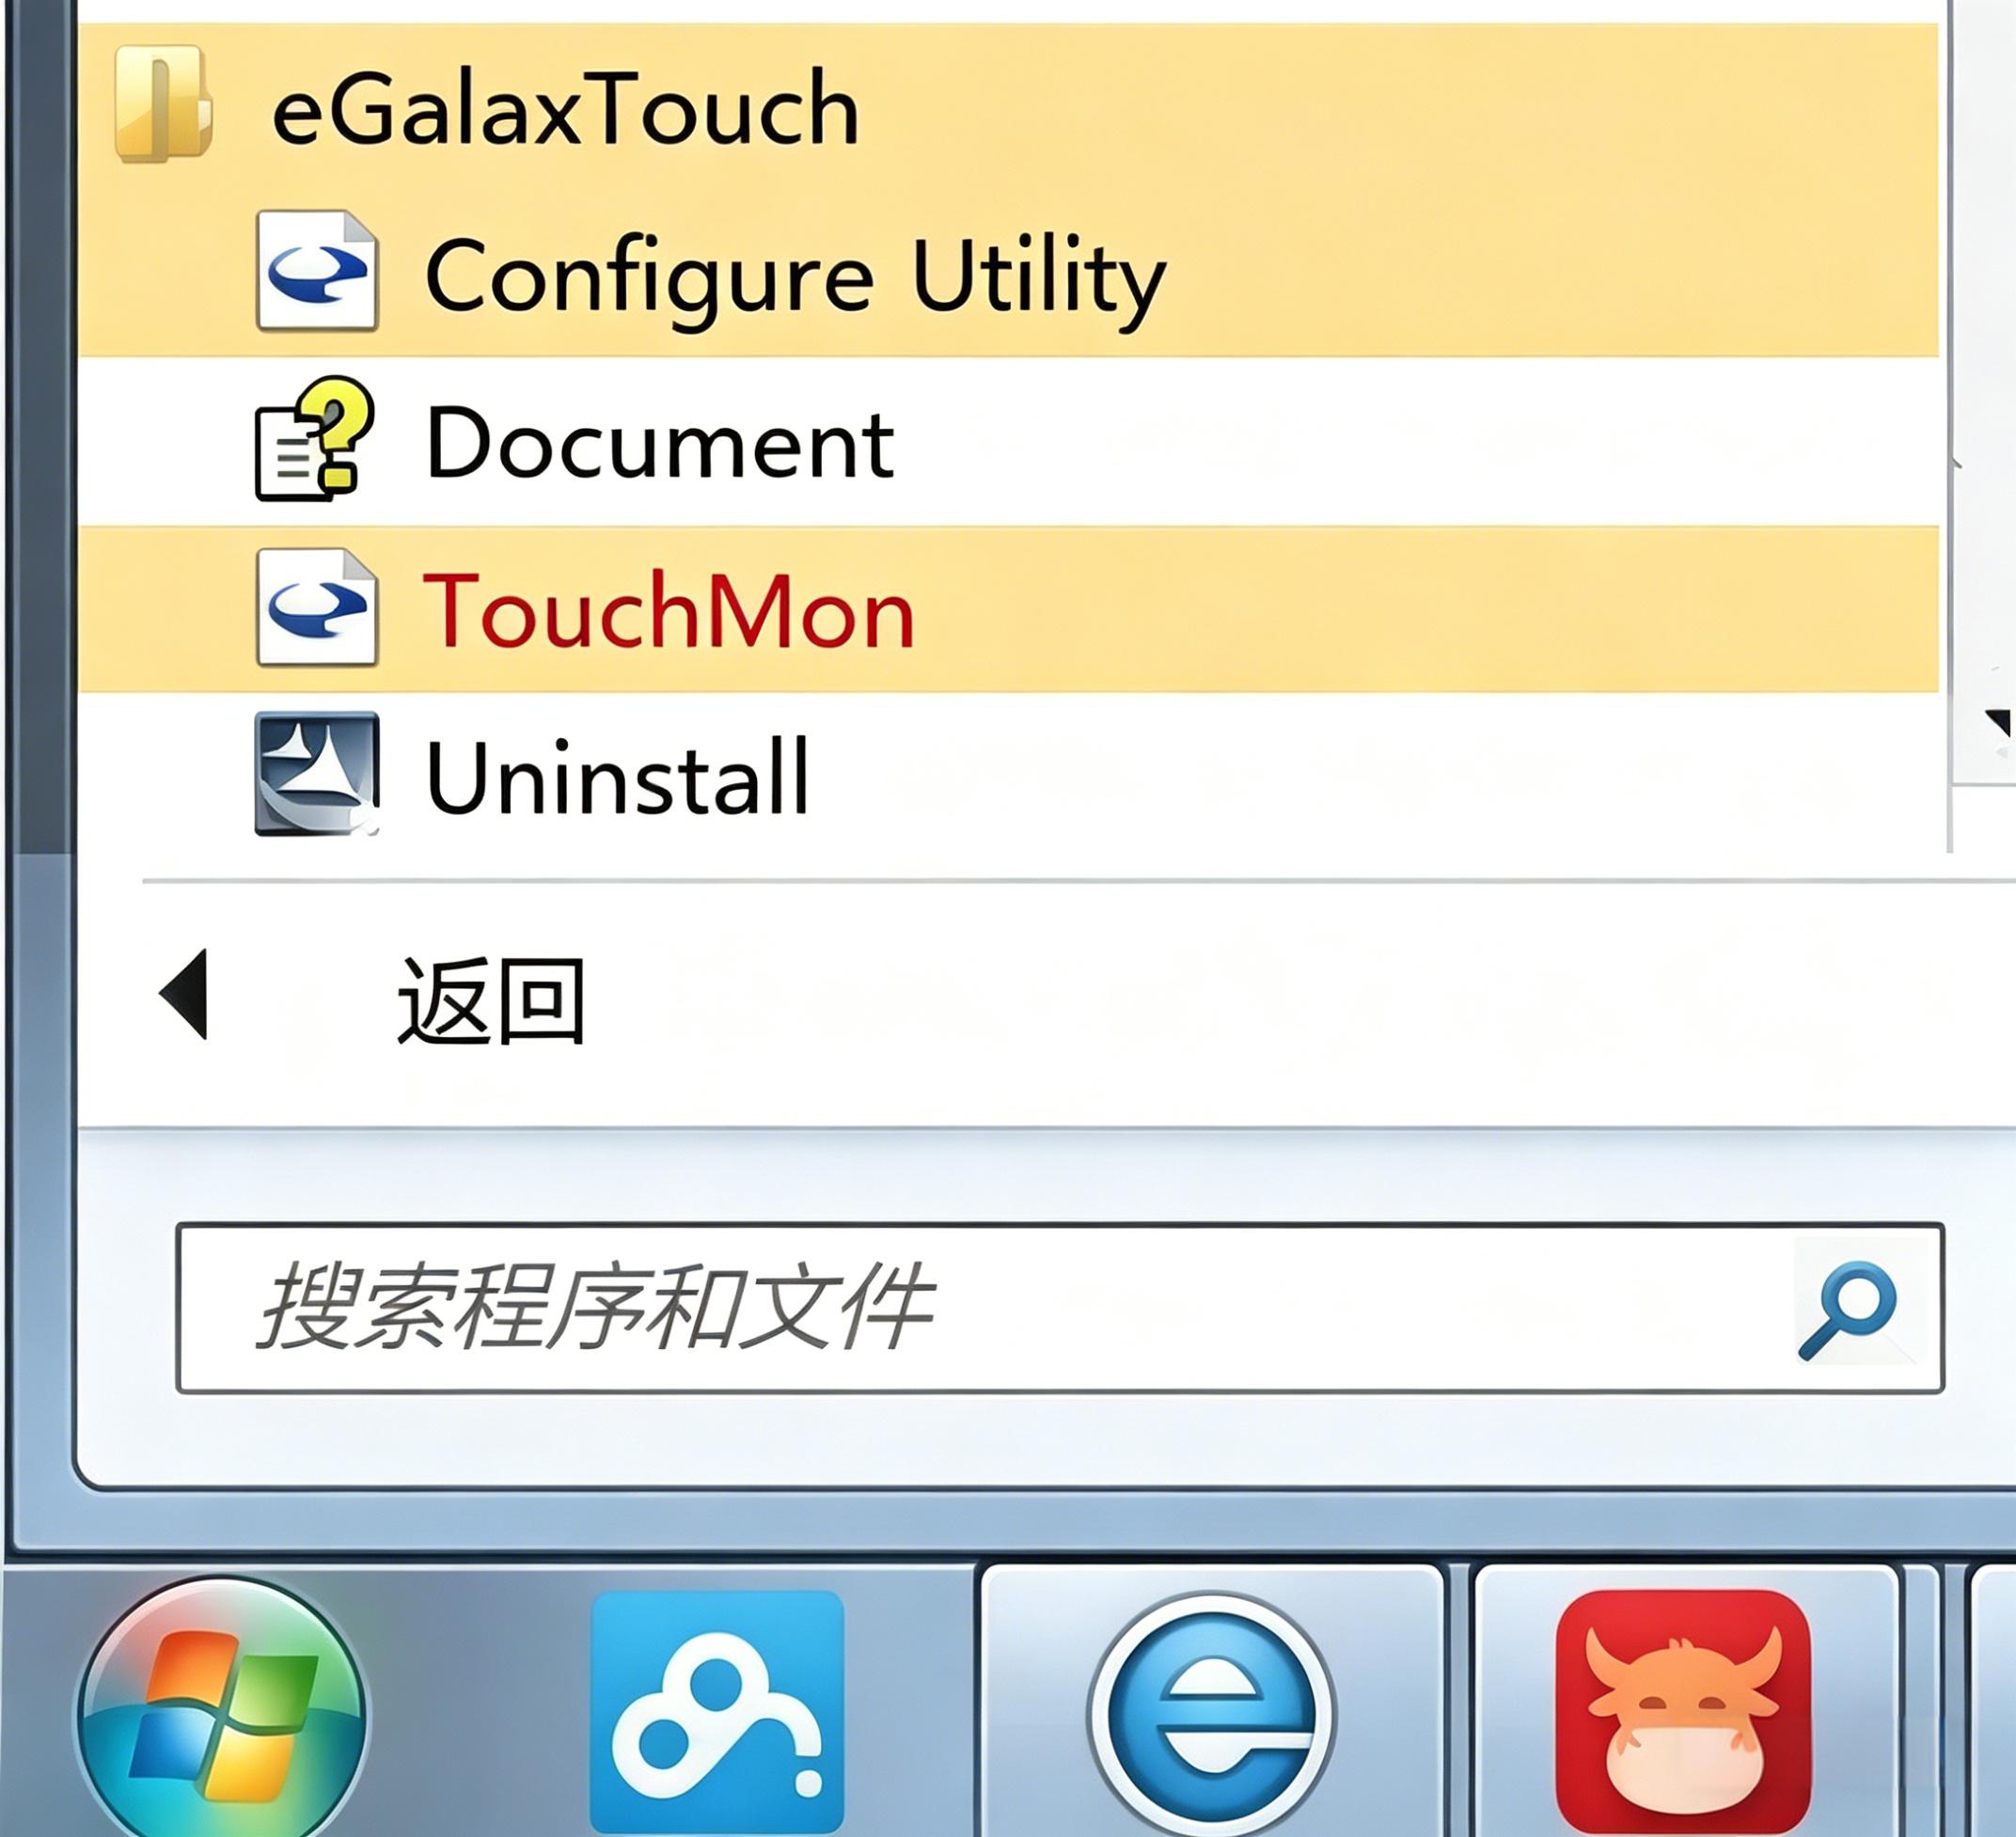
The touchscreen uses a Taiwan-made controller chip paired with eGalaxTouch software for calibration. Press and hold the screen to access right-click; adjust hold duration and disable buzzer sound via eGalaxTouch settings.
Solution: Open the positioning software and double-click the eGalaxTouch program (see image ①) to set 4-point calibration (suitable for normal situations), 9-point calibration, or 25-point calibration (for regional drift issues where outer edges are accurate but the center is off).
When the unit malfunctions, try the following two methods. If the fault still cannot be resolved, contact our after-sales service department promptly and we will arrange a factory repair.
Method 1: Use the unit's power button or plug/unplug the power cord to restart the device.
Method 2: Restore factory settings. Using Android 5.1 as an example, the steps are as follows:
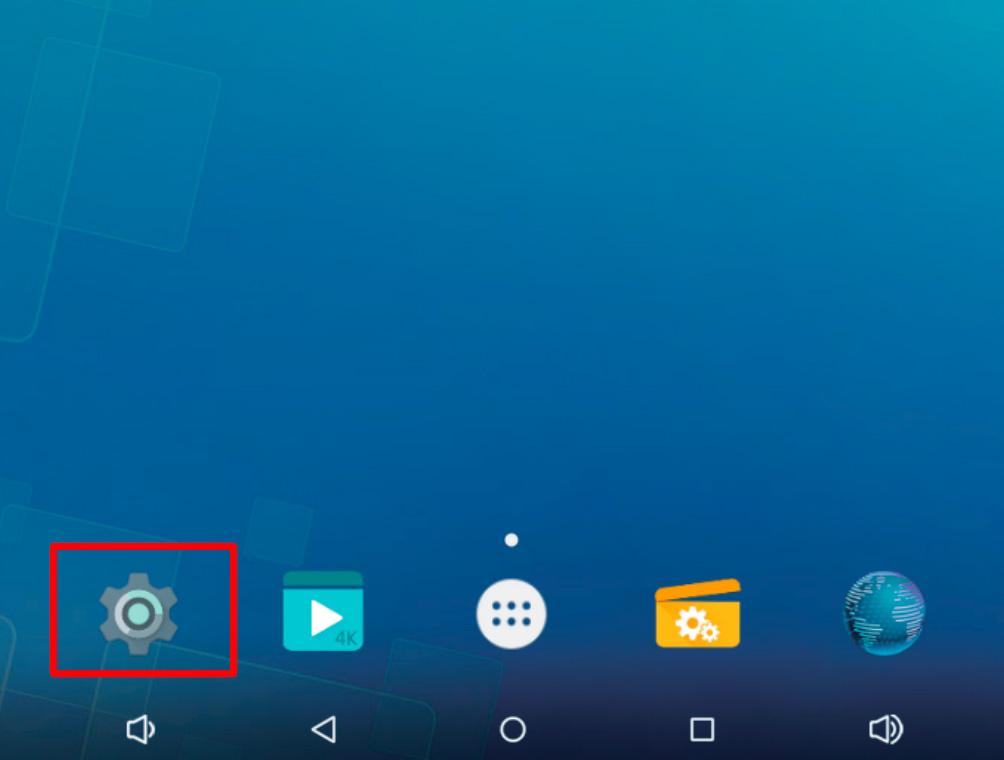
1. Find the Settings icon in the Android interface
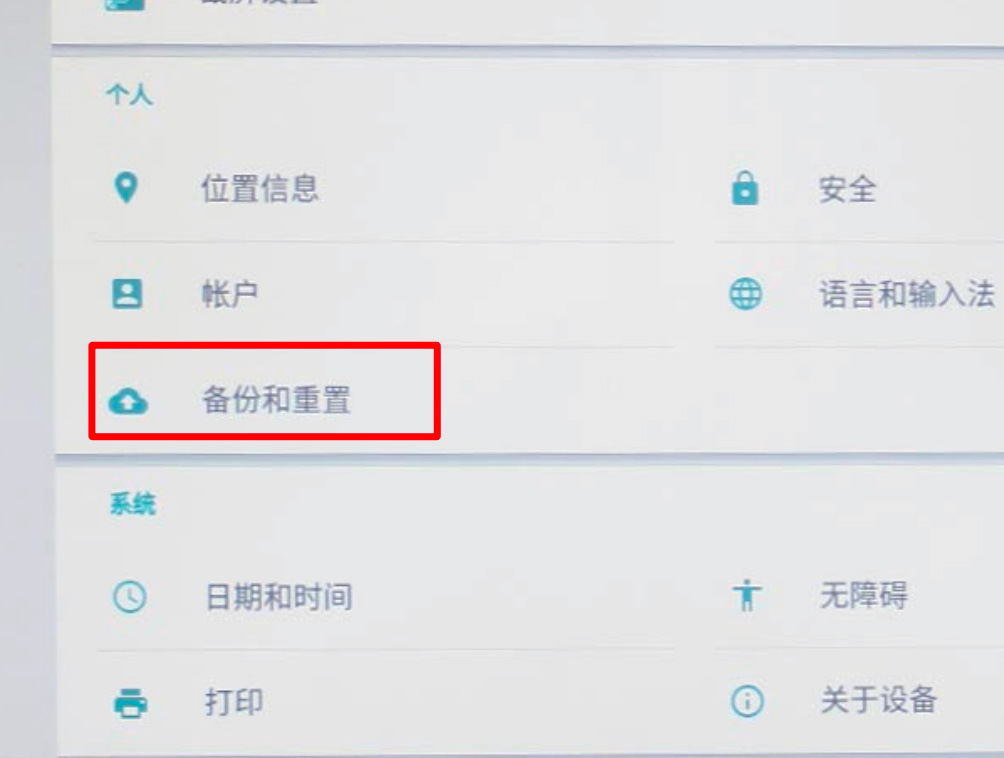
2. Enter Settings, select Backup & Reset
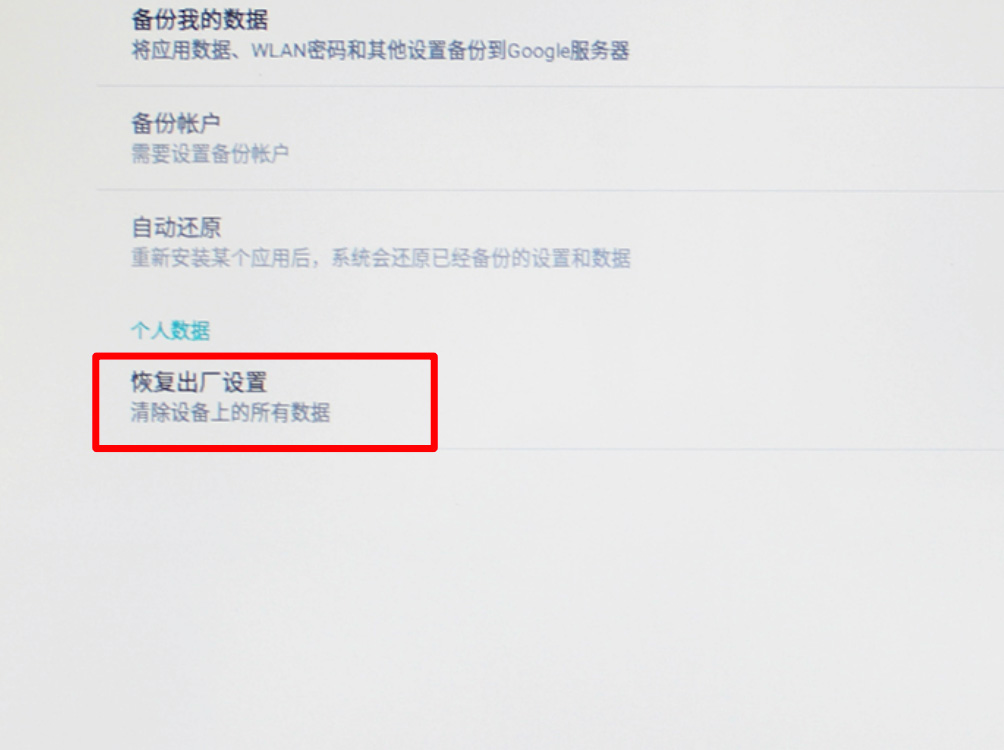
3. Tap Factory Data Reset
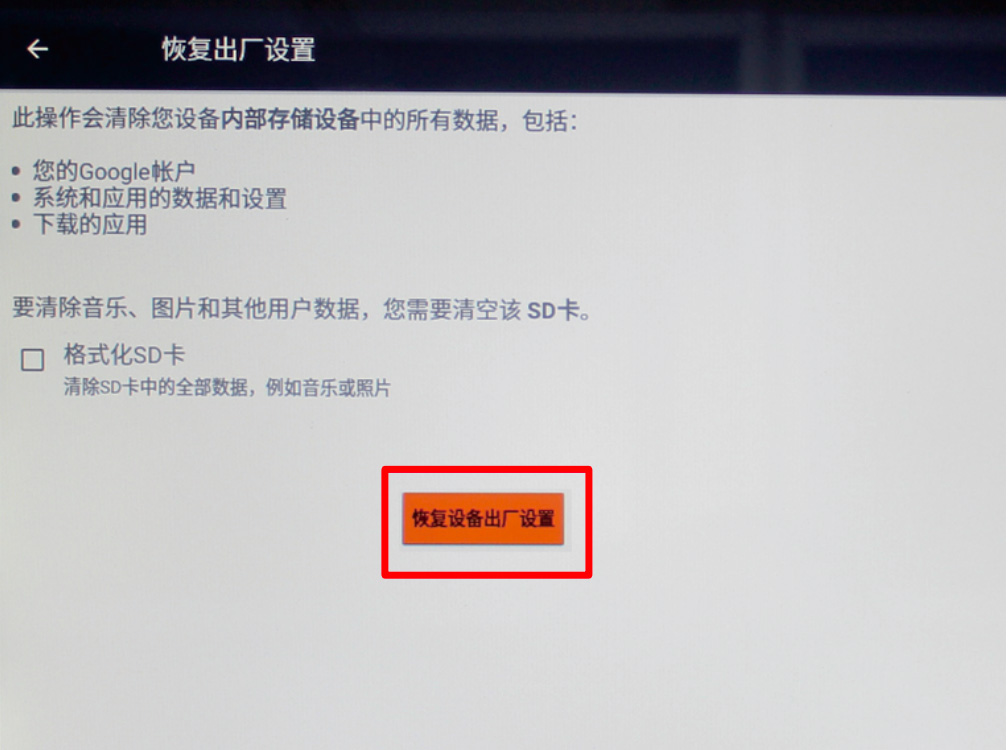
4. Check "Format SD Card" if needed, then tap Reset button (do NOT check if SD card has important data)